
How to Make Beautiful Fluffy Christmas Bows in 5 Easy Steps


Learn how to make the easiest fluffy Christmas bows in minutes. A great way to add style to wreaths, gifts, and other holiday home décor.
Are you a crafter?
I try to be.
Really I do!
I have so many amazing and incredible ideas running through my head.
When I see things for sale in a store I think to myself…I can totally do that.
I’m always so inspired by the craft projects I see on Pinterest, Instagram, or even TikTok.
But I’ll be honest with you…I’m not all that patient.
So, I usually just wind up buying décor pieces instead of making them.
However, the interest is there…I really want to be more creative and maybe save some money in the process.
Because I’m kinda cheap too! LOL
I hate spending money on something that looks easy enough to make.
Last year I updated my Christmas window greenery swags and made new bows for each one.
You can see exactly how I crafted the simple single-looped bows in this post.
I really loved the new look of my outdoor decor because the ribbon I used for the bows is just so pretty.
It was red and black check plaid, which is totally my style, and looked perfect on my windows flanked with our black shutters.
But if you’ve been around here for a while, you may remember that we had our house painted this past summer you can see the before and after pictures here.
And the bows I made last year didn’t coordinate quite as well with the new color scheme of my home.
No worries…I just got some new spools of ribbon to make more bows and update the look of those window swags again this year!
Let’s see how easy it really is to make your own fluffy bows!
- What Materials Do You Need to Make Bows?
- Supply List for DIY Bows
- How to Make Fluffy Bows with Wired Ribbon
- Step 1: Cut Your Ribbon
- Step 2: Make Your Loops
- Step 3: Assemble Your Bow
- Step 4: Create Your Bow Tails
- Step 5: Fluff and Attach Your DIY Bow
- Tips to Make the Best Christmas Bows
- Creative Ways to Use DIY Bows on Christmas Greenery
- Ideas for Decorating Your Holiday Home with Handmade Bows
- Jazz Up Your Gift Wrapping with DIY Bows
Some of the items used in this post include affiliate links. As an Amazon Associate, I earn from qualifying purchases at no added cost to you. You can read our full affiliate disclosure policy here.
What Materials Do You Need to Make Bows?
To make these super simple bows in minutes you will need a few basic craft supplies.
You may already have some of these at home but if you don’t check out the list below.
Supply List for DIY Bows
Click on any word in this list to shop for items
- Scissors
- Ruler
- Stapler
- Pipe cleaners or floral wire
- Wired ribbon (this is a similar style to the one I used)
Of course, you can choose any ribbon pattern you love and coordinates with your holiday decor.
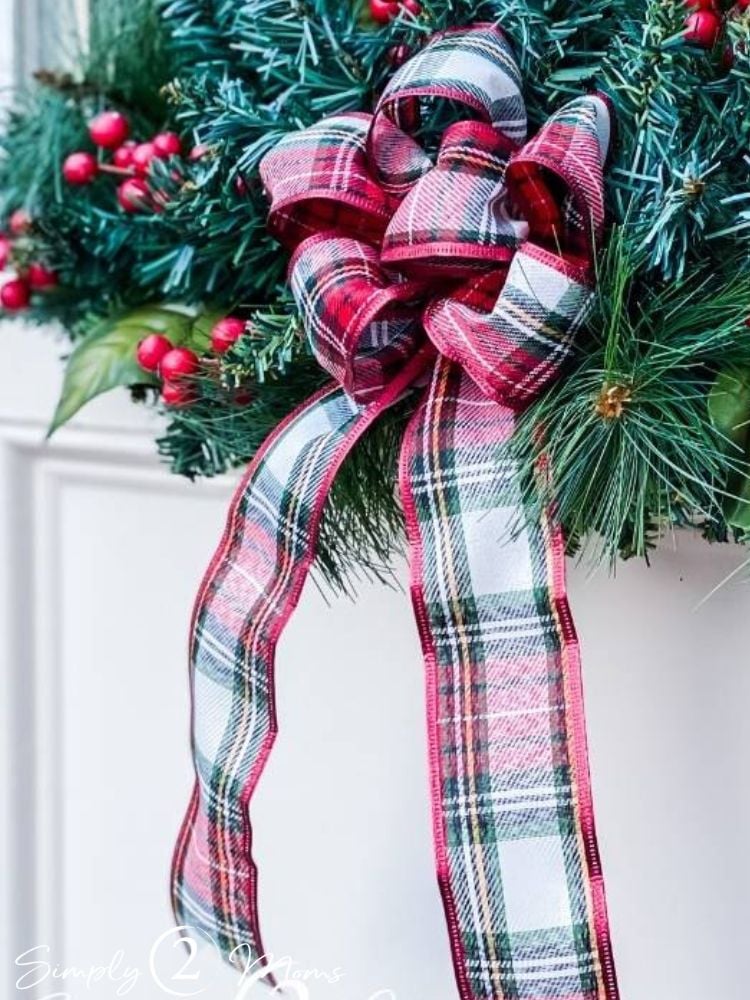
Since I liked the red and black plaid ribbon that I used last year so much, I wanted to make my new ribbons with that same pop of red.
And of course, the bows had to be plaid again because is there anything more festive at Christmas than plaid?
I don’t think so!
I found a classic tartan plaid ribbon at Walmart and knew it would be perfect for my outdoor Christmas decorations.
Unfortunately, the same ribbon isn’t available online any longer but I found this plaid one from Amazon that’s very similar if you love plaid too.
S2M Tip: Use wired ribbon so that you can easily manipulate and twist the ribbon to form a full bow.
How to Make Fluffy Bows with Wired Ribbon

I had planned to repeat the same steps I followed last year for my easy Christmas DIY bows.
But I soon realized that the new ribbon was a bit narrower than the one I used last year.
This ribbon was only 2″ wide and the old ribbon was 2 1/2″ wide.
After assembling the first bow it looked a little dinky…ugh!
So, I decided to go with plan B and “beef up” the bows and make them more full and fluffier.
Step 1: Cut Your Ribbon

First, I cut the 2″ wide wired ribbon into 16″ strips.
These pieces of ribbon will be used to make the loops of the bow.
Next, I cut the ribbon into 24″ strips for the tail of the bow.
I find it easiest to cut all my ribbon pieces at once before moving on to the next step.
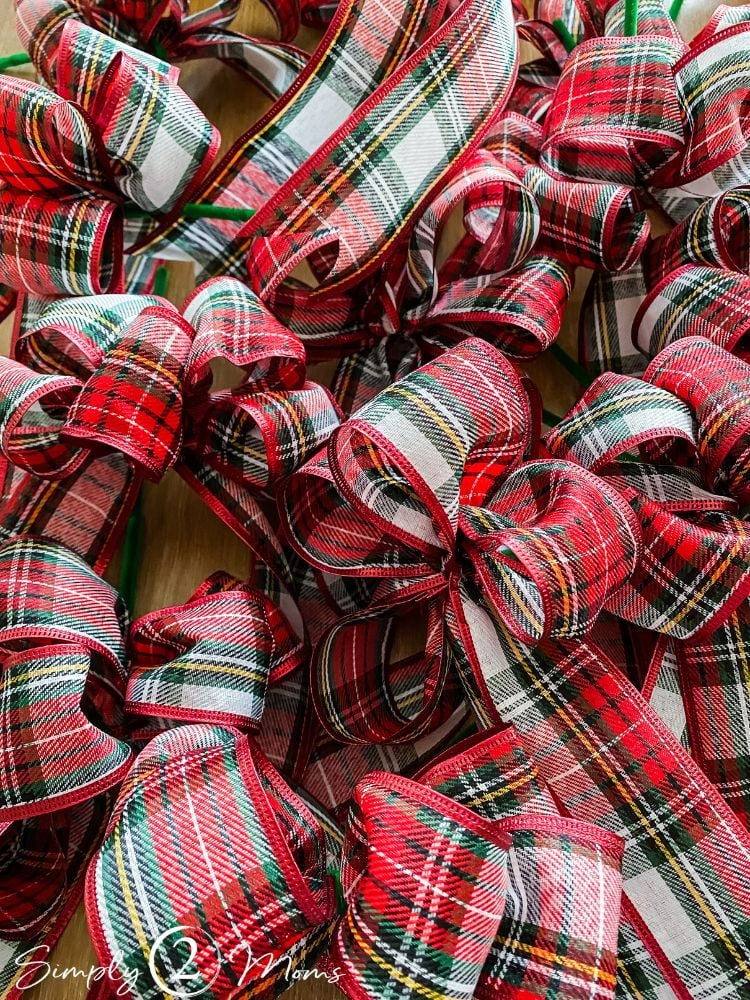
To make each Christmas bow I used three 16″ pieces of ribbon and one 24″ piece of ribbon.
Since I was creating a total of 15 holiday bows, I cut enough ribbon to assemble all of the bows.
- 45 – 16″ long
- 15 – 24″ long
Step 2: Make Your Loops

Once all my ribbon was cut I stapled the ends of each 16″ ribbon together to form a loop.
I just used a regular household stapler for this step.
You can use a glue gun or even glue dots if you prefer but I found stapling to be the quickest option.
S2M Tip: You can make quick work of this project by completing all of one step before starting the next step rather than assembling an entire bow. Cut all your pieces of ribbon. Then staple all your ribbon then assemble bow.
Step 3: Assemble Your Bow

After all the 16″ pieces of ribbon were stapled to create a circle, I grabbed three of the loops and stacked them on top of one another.
Be sure all your loops are lined up.
Step 4: Create Your Bow Tails

Add one of your 24″ lengths of ribbon to the bottom of the stack of three stapled loops to make the tail of your bow.
Check to make sure the center of the longer piece of ribbon is in the middle of your stack of three loops so your ribbon turns out even.
You can use either a pipe cleaner or floral wire to assemble your bows.
I’ve used both and they each work great, so just grab what you have readily available.
Step 5: Fluff and Attach Your DIY Bow

Scrunch the three loops and the tail ribbon pieces together with your fingers, then wrap the pipe cleaner around the middle of the bow.
Wrap the floral wire or pipe cleaner tightly to be sure your ribbon is securely assembled.
I used these green pipe cleaners so that they blend well with my Christmas greenery and aren’t as noticeable.

After your ribbon is secured, fluff out the three loops on either side of the pipe cleaner until you get a fluffy look you love.
Once your bow is fluffed you can snip the ends of the ribbon into a V-shape with a pair of scissors.

I used a full-size pipe cleaner which gave me the extra length needed to adhere the new bow to my window greenery swags.
Besides allowing you to fluff your bow, using wired ribbon gives you the flexibility to bend the tails of the bow so they lay nicely on whatever Christmas decor you’ll be adding your ribbon to.

The new bows still give me a pop of the red color I love on the outside of our home during the holidays.
But switching to the classic tartan plaid added some white to the bows and coordinated better with the freshly painted lighter color of our shutters.
Plus the new bows are fuller with the additional loops and bring even more color to the window swags.
Tips to Make the Best Christmas Bows

- For a fluffier bow, use a wired ribbon. Wired ribbon is easier to manipulate and it will hold its shape better.
- To make a larger bow, use longer pieces of ribbon.
- To make a smaller bow, use shorter pieces of ribbon.
- To make a fuller bow, use more loops until you get the fullness desired.
- To make a bow with multiple colors, use two different colors of ribbon.
- Use different colors and patterns of ribbon to match your holiday décor.
Creative Ways to Use DIY Bows on Christmas Greenery
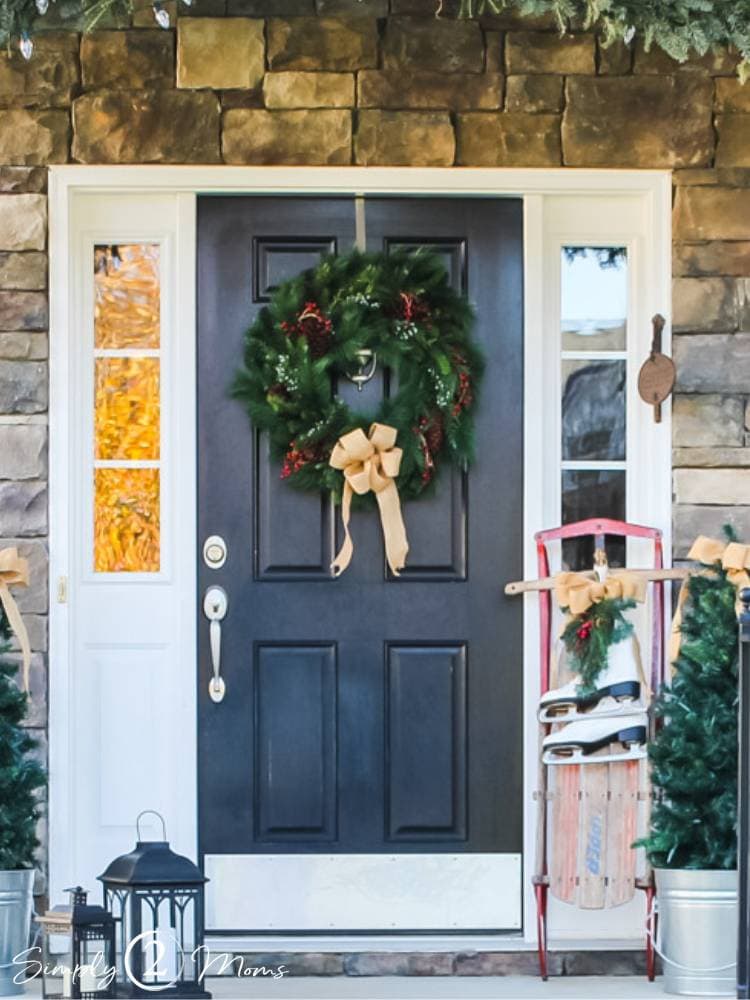
DIY Christmas bows are a beautiful way to decorate your holiday wreath to hang on your front door and welcome guests.
Simply attach the bow to the front of the wreath using floral wire, a twist tie, or a pipe cleaner.
Before introducing red plaid to the exterior of my house, I used wired burlap ribbon to dress up the greenery.
I love the natural vibe that burlap brings to greenery…don’t you?
Check out this DIY hoop wreath with a plaid handmade ribbon detail Anne created that’s just so pretty and festive for Christmas.
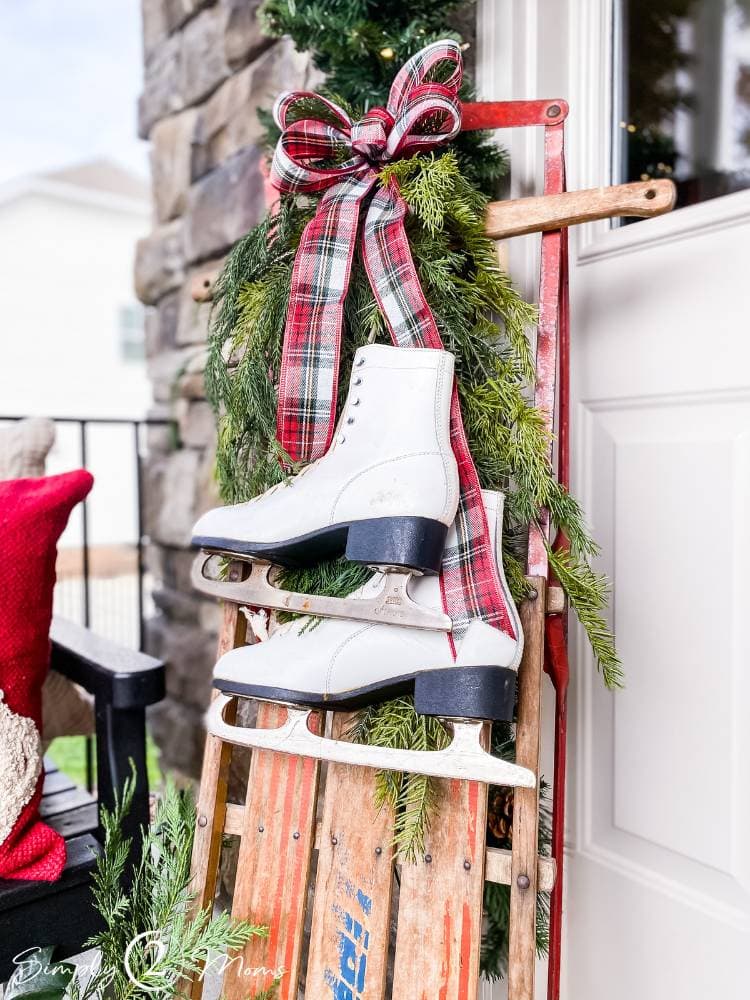
Outdoor greenery like wreaths, window swags, garland, and even a group of stems hung from a vintage sled all benefit from a pretty fluffy bow.
I just attached the bow to a faux bushel of mixed greens that gives my old sled and ice skates a little something special.
Can you believe that these skates and sled were mine as a kid?
So apparently I’m old enough that my childhood toys are now officially vintage. LOL
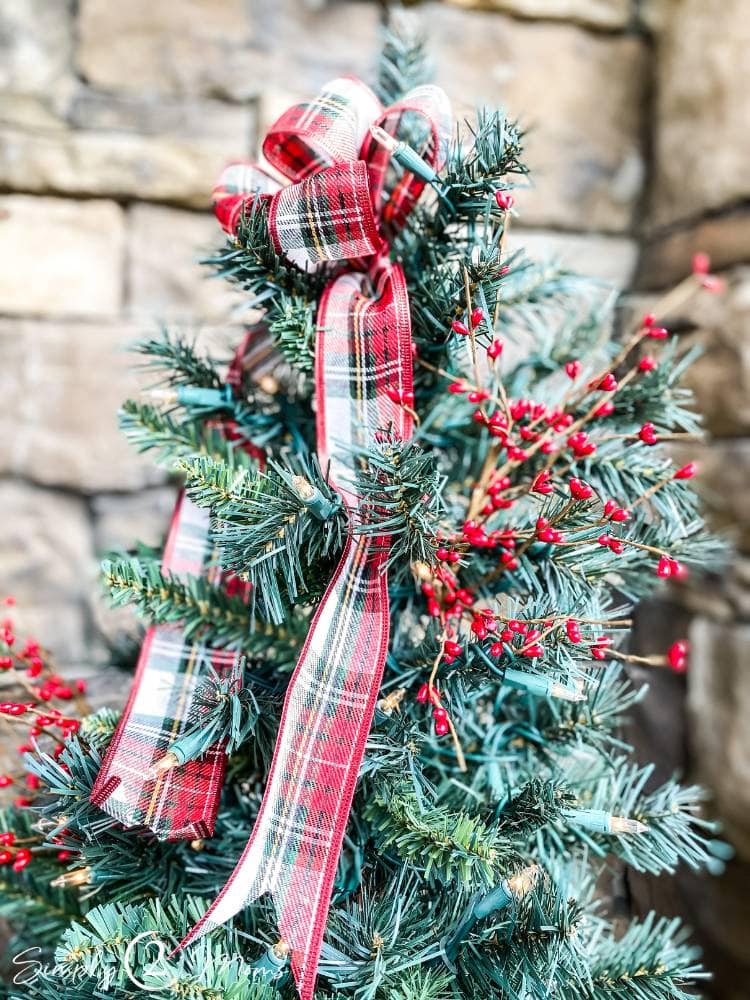
If handmade bows are amazing to use on so many different holiday greenery items like wreaths and garlands why not Christmas trees too?
Make a bow big enough to use on top of a Christmas tree in place of a star.
Big fluffy bows can create a beautiful tree topper.
I only have two tails on this DIY wired ribbon bow because it’s a little Christmas tree but use several longer pieces when making your bow to have multiple tails.
You can even hang a bunch of bows from the branches of the tree in addition to ornaments.
Ideas for Decorating Your Holiday Home with Handmade Bows
DIY Christmas bows can also be used to decorate so many other areas of your holiday home.
Of course, as we’ve seen ribbon is a stunning addition to your Christmas greenery but bows can also be used by themselves.
Ribbon is a fairly inexpensive material to use when decorating your home so why not make a bunch of bows this year to add a super affordable festive holiday vibe?
Consider adorning mantles and shelves with bows to coordinate with the style and color of your room.
Add handmade fluffy bows to your fireplace mantel, staircase, or doorways.
Jazz Up Your Gift Wrapping with DIY Bows
DIY Christmas bows are a great way to add a personal touch to your Christmas gifts.
Choose a ribbon that matches your wrapping paper and make a fluffy bow for your package.
When making a bow for a present follow the steps above to create your loops and then add an extra long piece of ribbon as your “tail”.
But instead of using that long piece as a tail you can wrap the ribbon around the middle of the box and adhere the ends of the ribbon to the bottom of the gift.
If you prefer a ribbon with tails then make your tag the same as the steps we went over at the beginning of this article and use double-stick tape to attach the completed bow to the top of your present.
Bows are a beautiful way to wrap your Christmas gifts for friends and family.
You can use your handmade bows to create a variety of different wrapping styles, from simple to elaborate.
Anne shares some unique and gorgeous ideas to wrap gifts with yarn that you won’t want to miss.

Click on the image to shop items from this post


Are you ready to start making some gorgeous fluffy Christmas bows?
We’d love for you to share your creations with us on social media.
If you have any questions or suggestions, contact me or leave a comment!
Don’t miss any of our tips, tricks, or stories! We’d love for you to follow us on social media! You can find us on TikTok, Instagram, Pinterest, and Facebook.

Pin it to Remember it:

Thank you so much for this tutorial, I almost gave up an bought bows.
So glad this tutorial helped you! It was a game changer for me when AnnMarie shared her method!
This is the BEST tutorial on bow making! I am 51 and have tried every possible way(bow maker gadget,free styling with just wire, ….) and they all were fails for me leaving me to pay to have my bows made. I can’t believe I have never seen this option until now but I am thrilled! Thanks so much❤️
Yay! We’re so glad AnnMarie’s tutorial helped you get the results you want! It was a game changer for me too. 🙂 Merry Christmas!
I love this idea.
Thanks so much, Cynthia! So happy to be able to help!